
Renovating a kitchen is the perfect moment to fix the two problems most kitchens share: not enough light and light in the wrong places. The solution isn’t one big fixture—it’s a clear, layered plan that combines island pendants (eye-level task + statement), under-cabinet lighting (shadow-free work light), and inside-cabinet LEDs (visibility and wow). This guide gives you practical, buildable steps—with sizing, spacing, wattage, and control tips—so your result looks designed and works flawlessly.
Plan the Layers (and Where They Go)
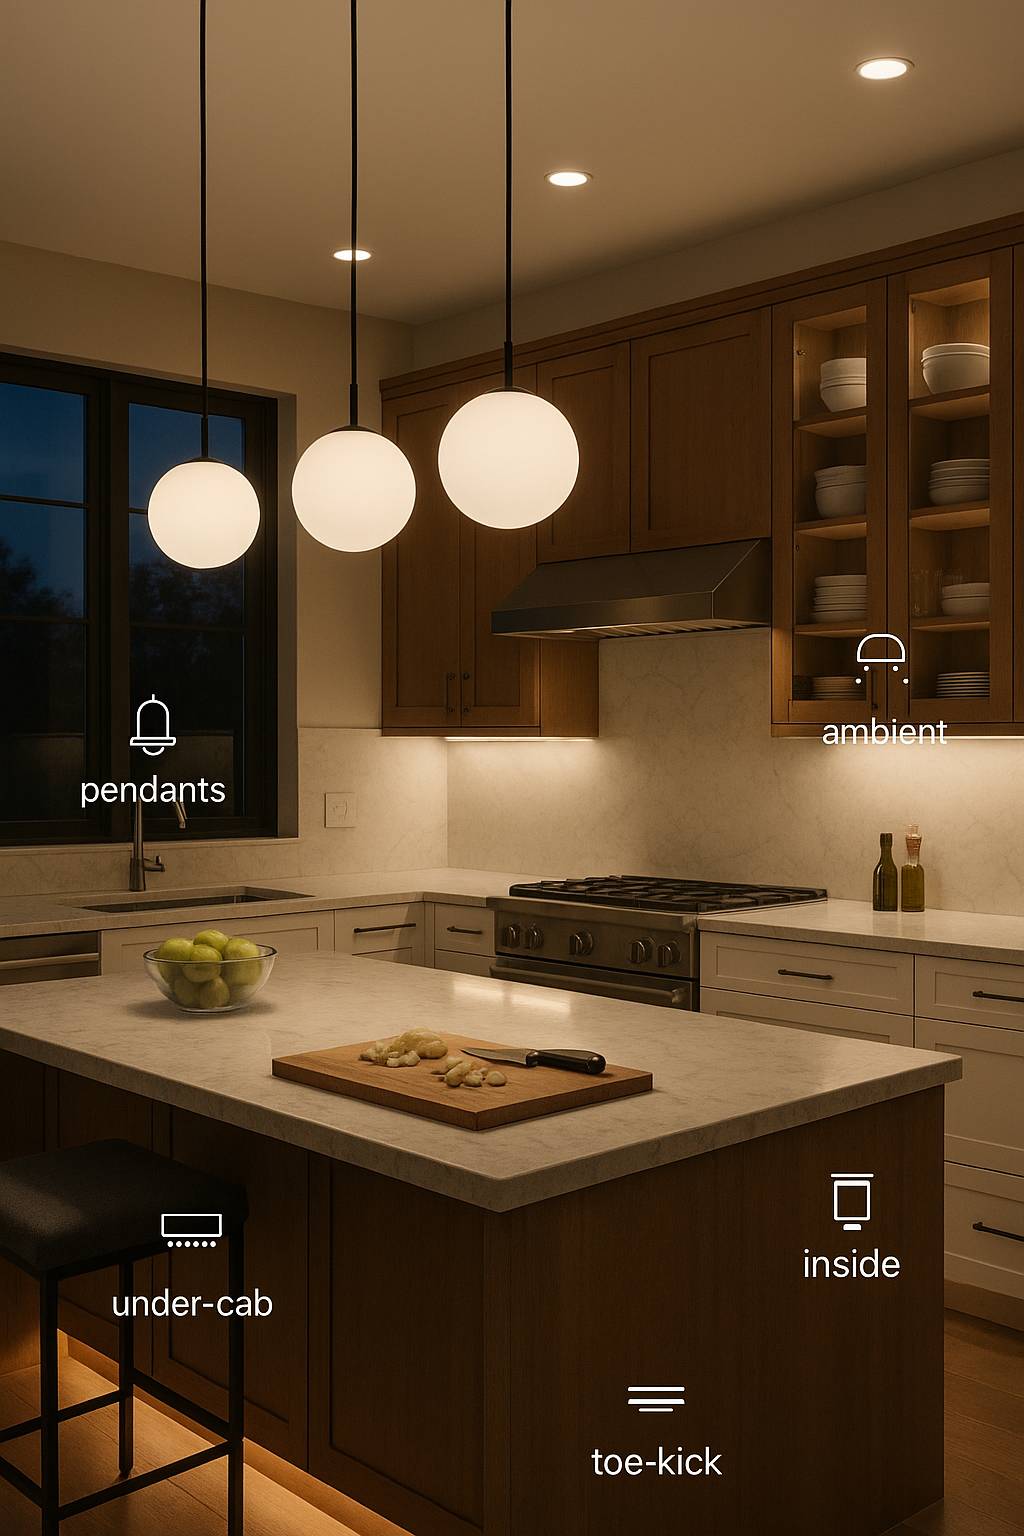
Think in zones first, fixtures second:
-
Work zones: island, sink, cooktop/range, primary prep run.
-
Storage & display: tall pantry, glass-fronts, deep drawers.
-
Ambient & pathway: general circulation, toe-kick nightlight.
Layer roles
-
Task: bright, directed light where hands/knives/recipes are.
-
Ambient: comfortable, even fill that reduces eye strain.
-
Accent: inside-cabinet, shelf, or crown LEDs that add depth.
DIY electrical sanity check
-
Put LED tape/bar lights on 24 V constant-voltage drivers for efficiency and lower current.
-
Plan one accessible location for drivers (above fridge cabinet, basement, or nearby utility bay) and run low-voltage to fixtures.
-
Use suitable protection (GFCI/RCD where required) and follow your local electrical code. When in doubt, consult a licensed electrician.
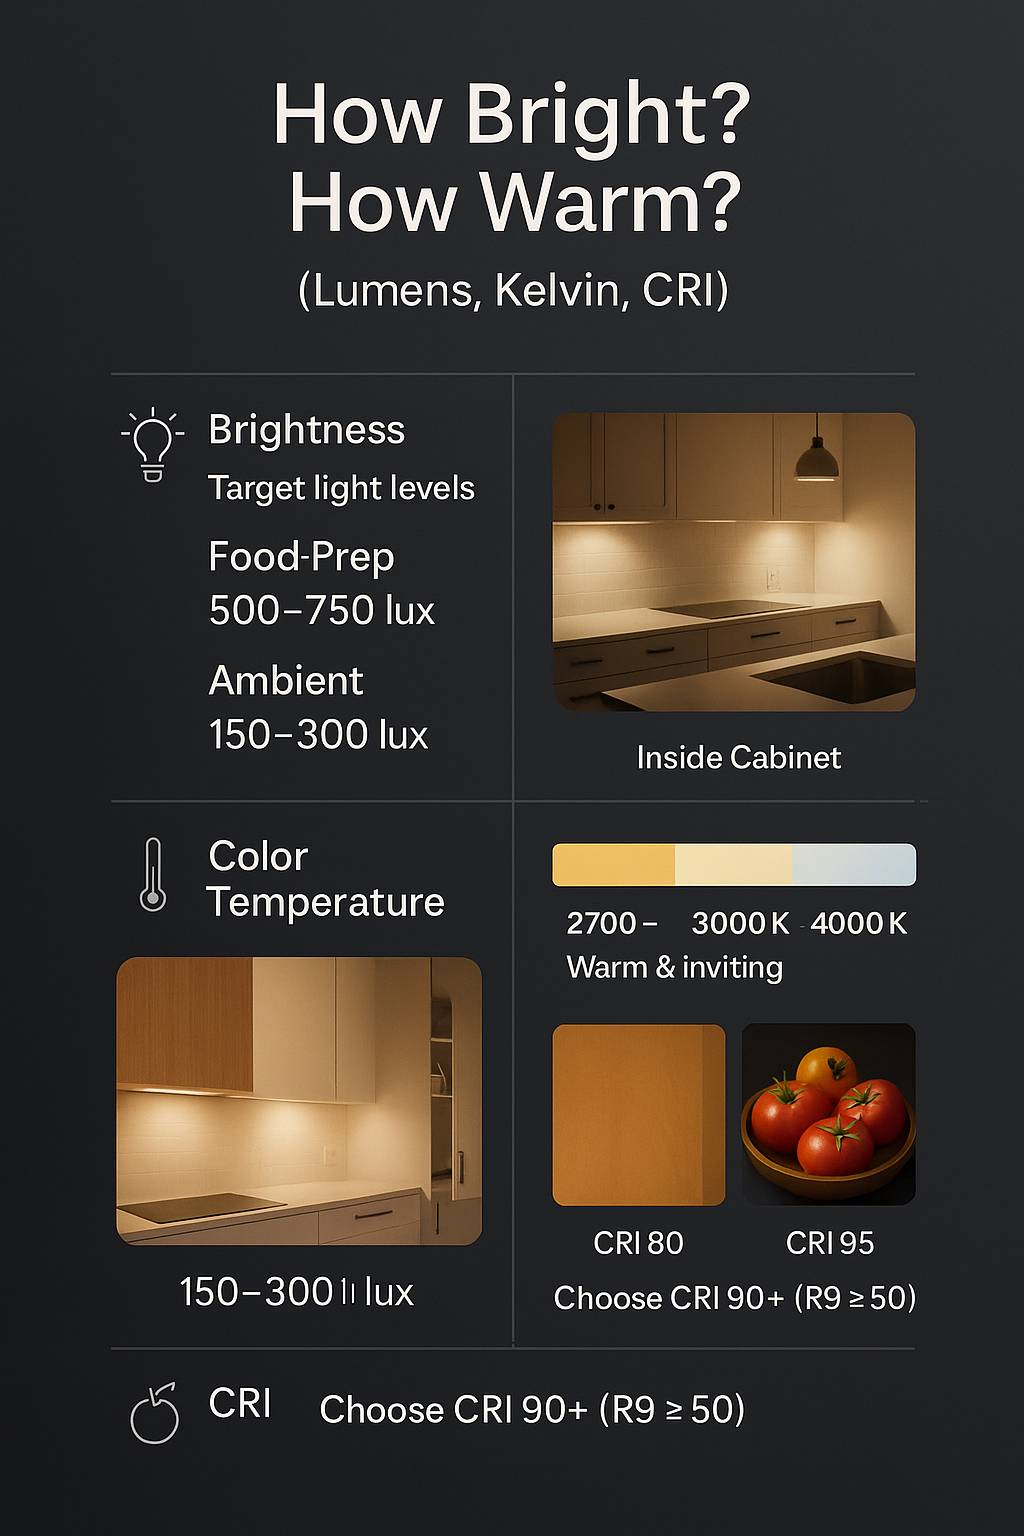
How Bright? How Warm? (Lumens, Kelvin, CRI)
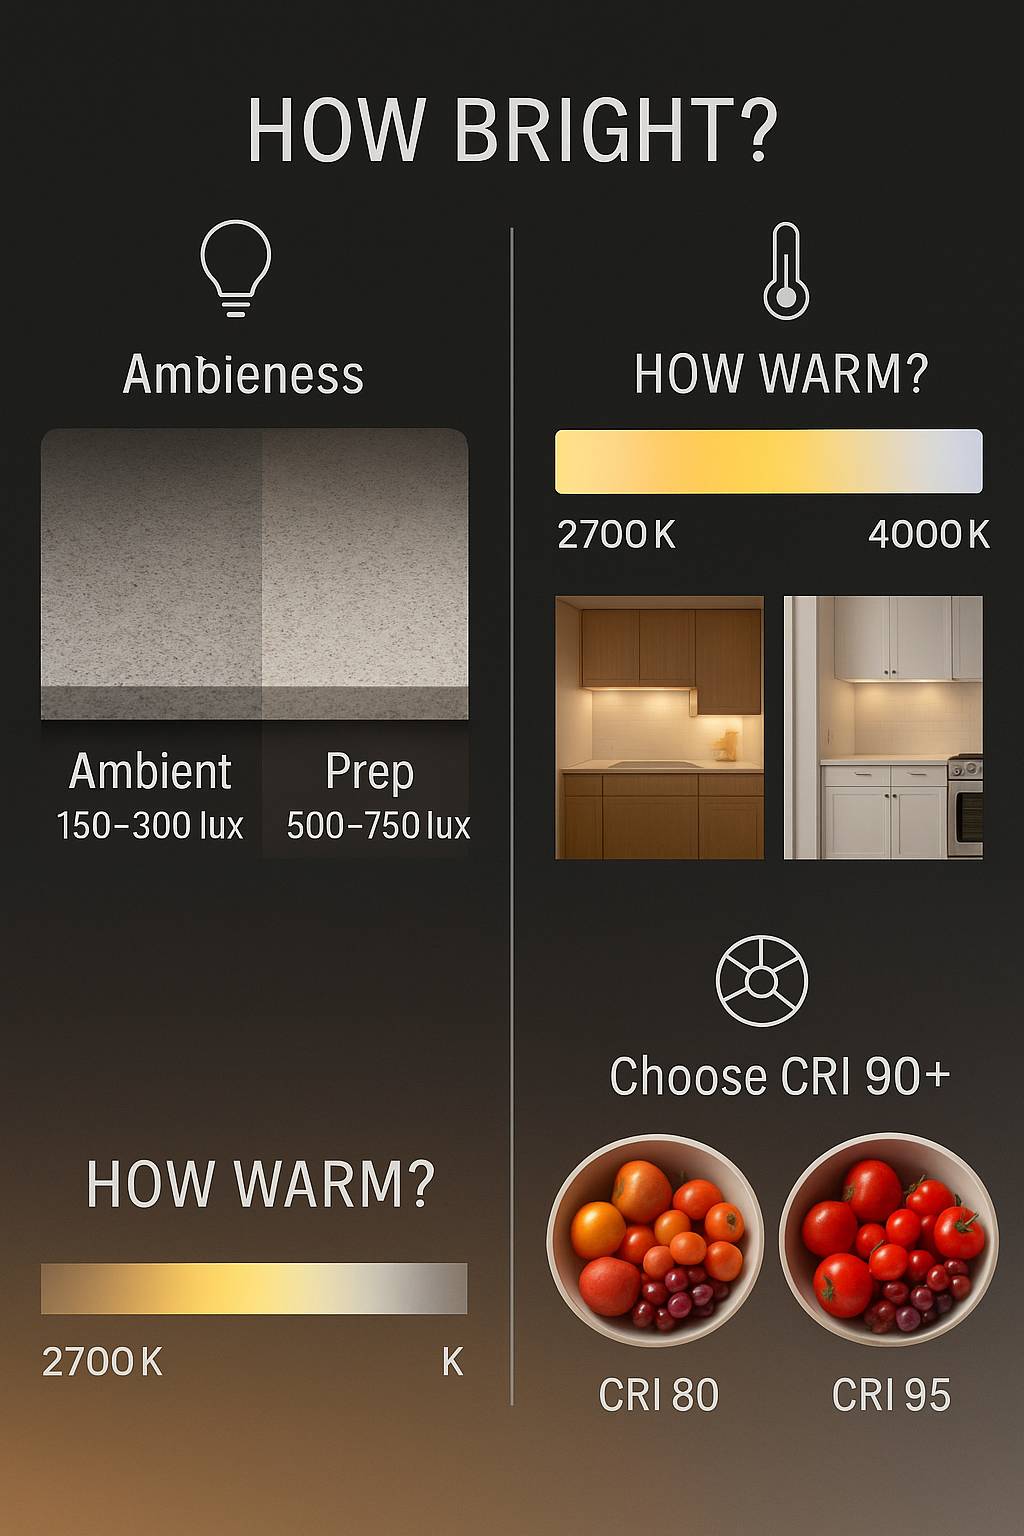
Dialing light quality is where “designed” kitchens separate from “just bright.”
Target light levels (guidelines)
-
Food prep surfaces: 500–750 lux (≈ 50–70 fc) on the countertop
-
General ambient: 150–300 lux (≈ 15–30 fc)
-
Inside cabinets/display: 150–300 lux inside the volume
Color temperature (CCT)
-
2700–3000 K: warm, inviting; great for natural woods and brass.
-
3000–3500 K: balanced neutral-warm; versatile for most kitchens.
-
3500–4000 K: crisp modern; works with cool stones/metals but can look “clinical” if overused.
Color rendering (CRI)
-
Choose CRI 90+, with R9 ≥ 50 if listed, so produce and meats look true rather than dull.
Island Pendants That Actually Work (Not Just Look Good)
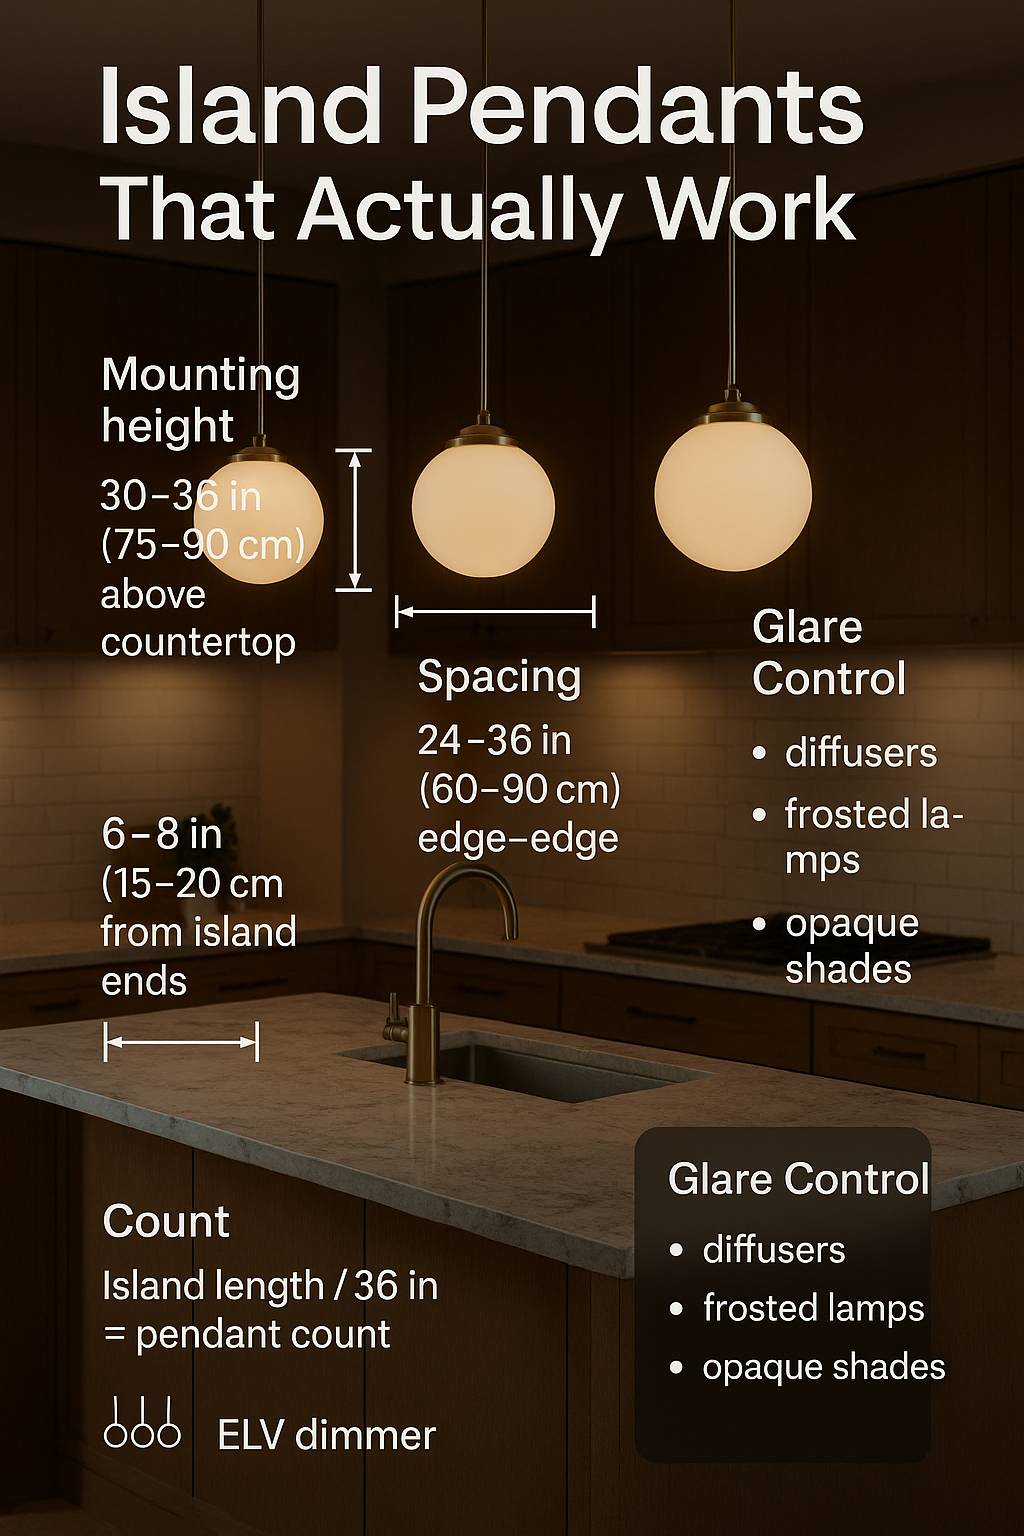
Mounting height:
Bottom of pendant 75–90 cm (30–36 in) above the countertop. Taller homeowners or fixtures with open bulbs trend toward the higher end to avoid glare.
Sizing & count (rules of thumb)
-
Pendant diameter: 25–45 cm (10–18 in) for most islands.
-
Count by island length:
-
Up to 180 cm (6 ft): 1–2 pendants
-
180–270 cm (6–9 ft): 2–3 pendants
-
270–360 cm (9–12 ft): 3 pendants
-
-
Spacing: measure edge-to-edge between pendants at roughly 60–90 cm (24–36 in). Keep ~15–20 cm (6–8 in) clearance from each island end.
Glare control
-
Prefer diffusers/frosted glass, drum shades, or opal globes.
-
If you love clear glass, use soft-white frosted lamps and dimming.
Dimming & layering
-
Pair pendants with dimmable recessed or linear ambient sources; you’ll want bright for prep, softer for meals.
Under-Cabinet Lighting: Shadow-Free Task Illumination
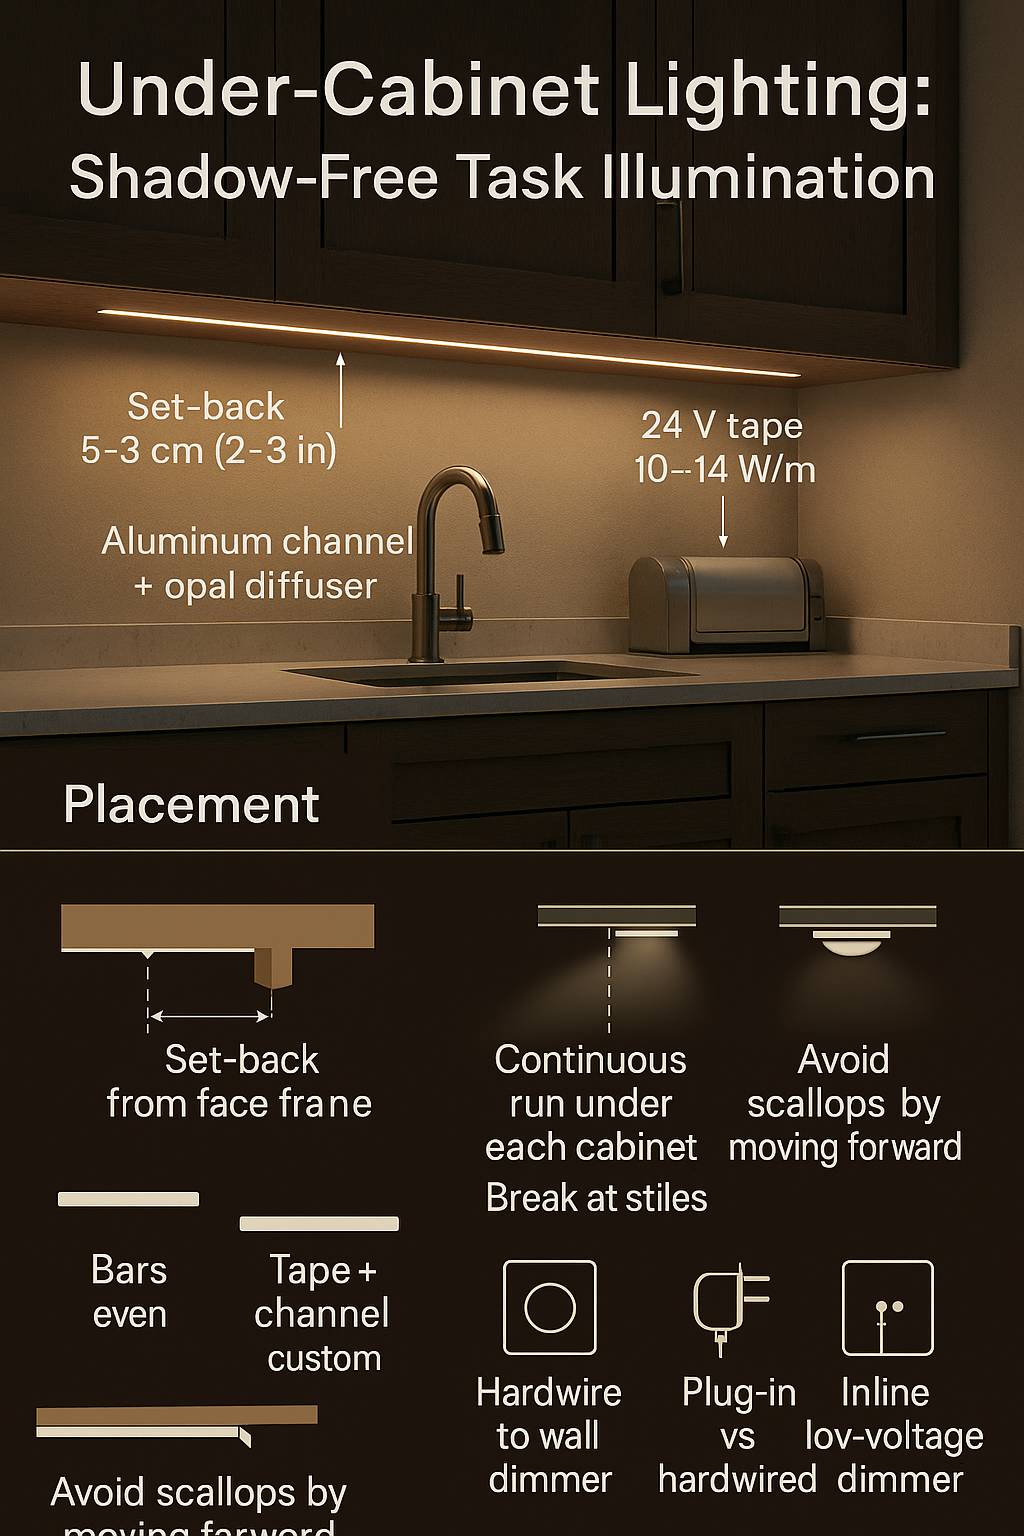
Why it matters: Upper cabinets block ceiling light, creating harsh shadows on countertops. Under-cabinet LEDs put the brightness where you work.
Form factors
-
LED bars/liners: even, bright, simplest pro-look.
-
LED tape in aluminum channels: highly customizable; use opal diffusers to eliminate dotting.
-
Puck lights: small pools of light; fine for accent but can scallop.
Placement
-
Mount toward the front: set back 5–8 cm (2–3 in) from the cabinet face to hide the fixture but light the counter front edge.
-
Run continuous light under each cabinet. If you must break, break at stile divisions, not mid-span.
Power & wiring
-
Prefer hardwired to a wall switch or a smart module for clean installs.
-
For tape: 24 V, 10–14 W/m (3–4.5 W/ft) is typical for strong task light.
-
Use aluminum channels for heat sinking and a tidy reveal.
Switching & control
-
One master wall dimmer for the whole run keeps it simple.
-
Or use inline low-voltage dimmers hidden in a cabinet and automation for scenes.
Inside-Cabinet LEDs (Glass Doors, Pantries, Drawers)
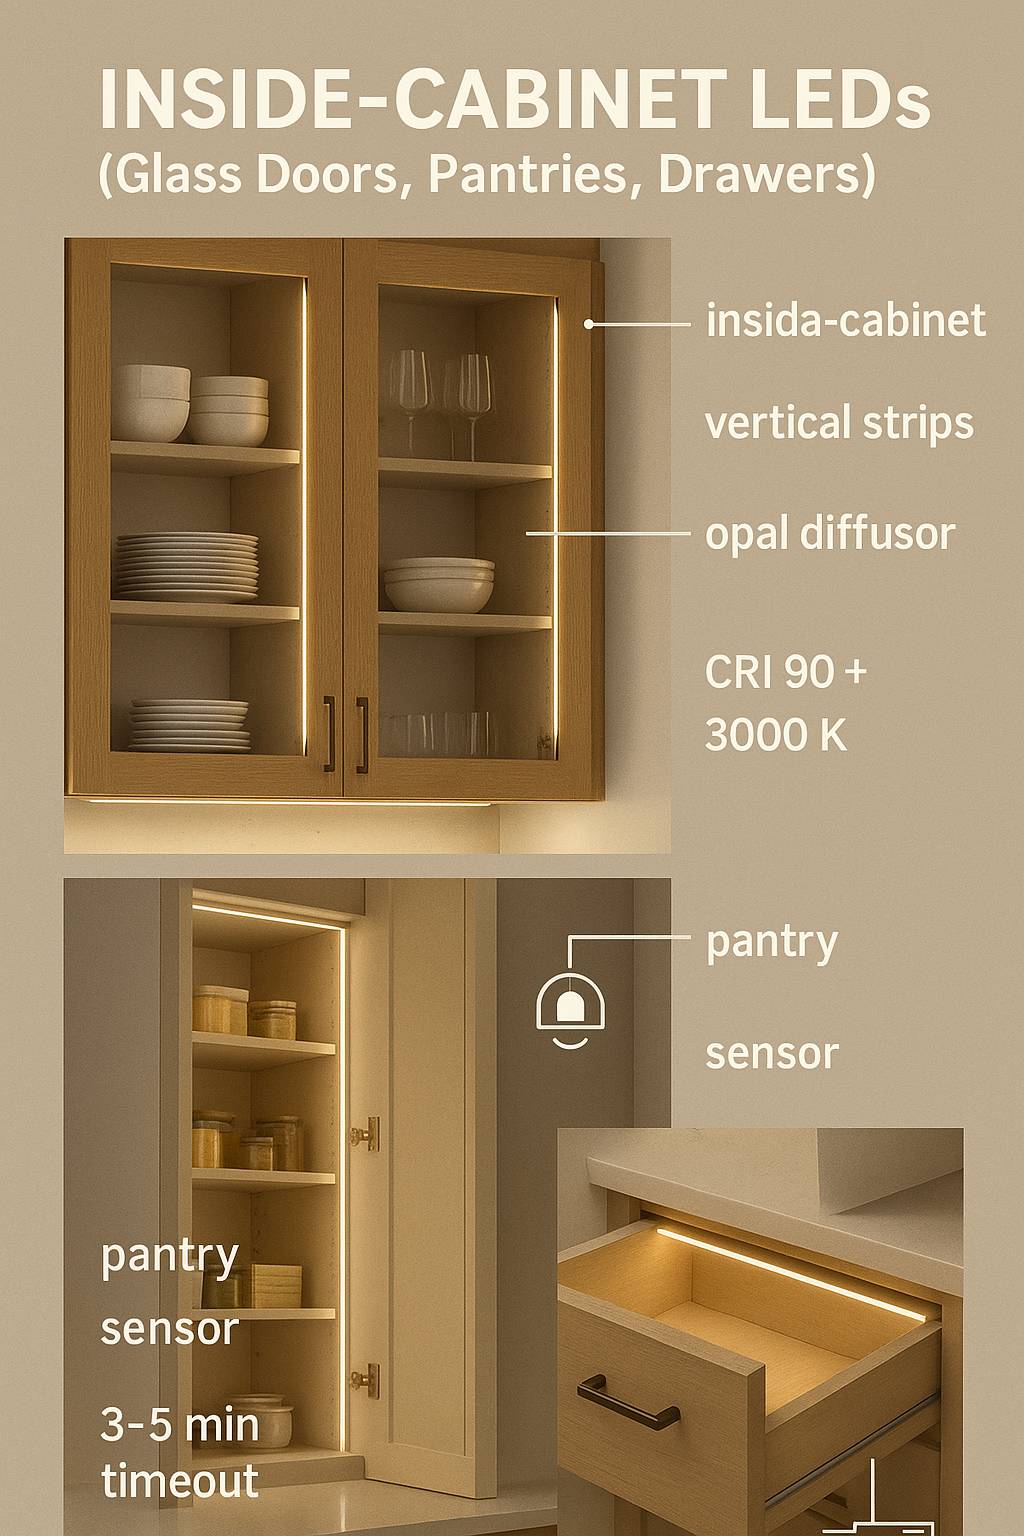
Inside lighting adds function and premium feel.
Where to put the light
-
Glass uppers: vertical strips inside the face frame, both sides if possible, or a short top rail facing down.
-
Pantries: vertical strips on hinge-side stile give even illumination.
-
Deep drawers: short strip with a low-profile channel at the top back rail.
Sensors
-
Magnetic or IR door sensors for auto-on, auto-off.
-
Night mode: cap max level at 10–20% to avoid glare at 2 a.m.
Diffusion
-
Always use opal lenses or deep channels to prevent LED “hot spots” on glass or glossy dinnerware.
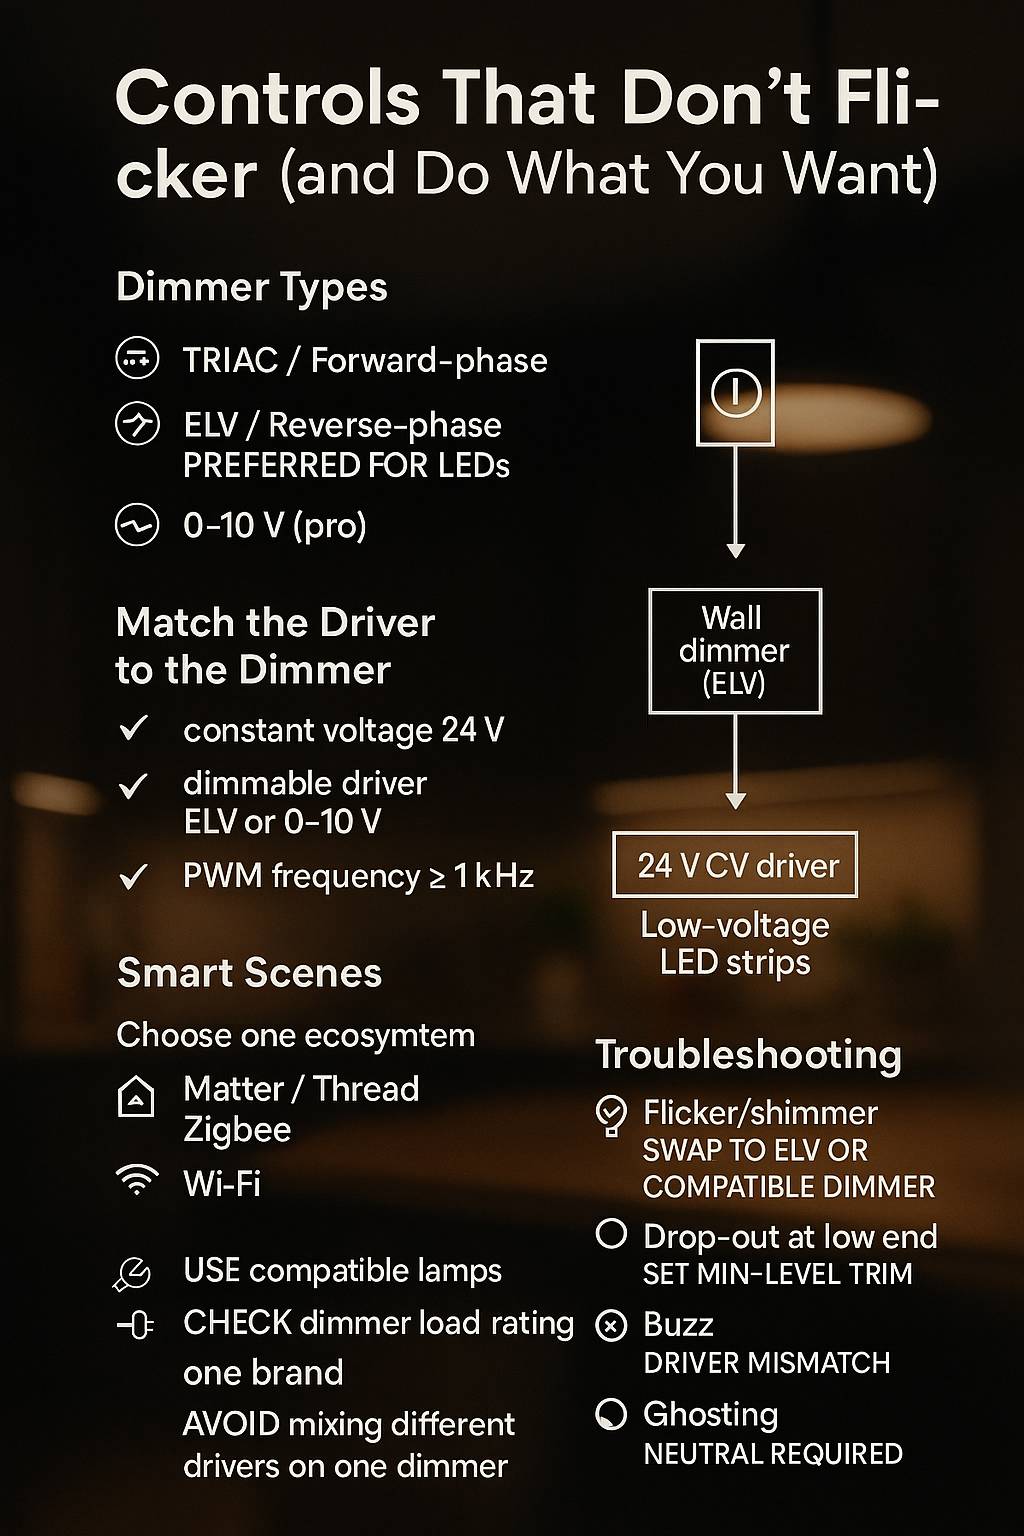
Controls That Don’t Flicker (and Do What You Want)
Know your dimmer language
-
TRIAC/forward-phase (a.k.a. MLV) vs ELV/reverse-phase: many LED drivers prefer ELV for smoother low-end dimming.
-
0–10 V: common in commercial/advanced residential drivers; gives wide dimming range but needs control wires.
-
Match driver → dimmer per manufacturer charts; this prevents shimmer and early driver failure.
Smart ecosystems
-
If you’re going smart, pick one: Matter/Thread, Zigbee, or Wi-Fi.
-
Keep drivers dumb and switch power with smart dimmers/modules for reliability.
-
Create scenes: Prep (100%) / Cook (70%) / Dine (40%) / Night (5%).
Safety, Heat & Compliance
-
Near sinks or damp areas, choose fixtures with appropriate IP ratings.
-
Use aluminum channels for LED tape—better heat dissipation = longer life and consistent color.
-
Respect wire gauge: for longer low-voltage runs, step up to 1.0–1.5 mm² (16–18 AWG) to reduce voltage drop.
-
Follow local code for box fill, cable type, and protection devices.
Budgeting & Sourcing (Good-Better-Best)
Typical mid-size kitchen (example):
-
3 pendants: $150–$600 each (shade + dimmable lamp)
-
Under-cab strip/liners (6–8 m / 20–26 ft): $15–$35 per ft installed equivalent (tape + channels + driver)
-
Inside-cab LEDs (3–4 doors + pantry): $150–$500 in materials
-
Controls: $60–$150 per dimmer/smart module
Tip: Splurge on under-cab task quality and reliable drivers/dimmers; save on pendant brand names if the shade is simple.
Step-by-Step Mini Installs
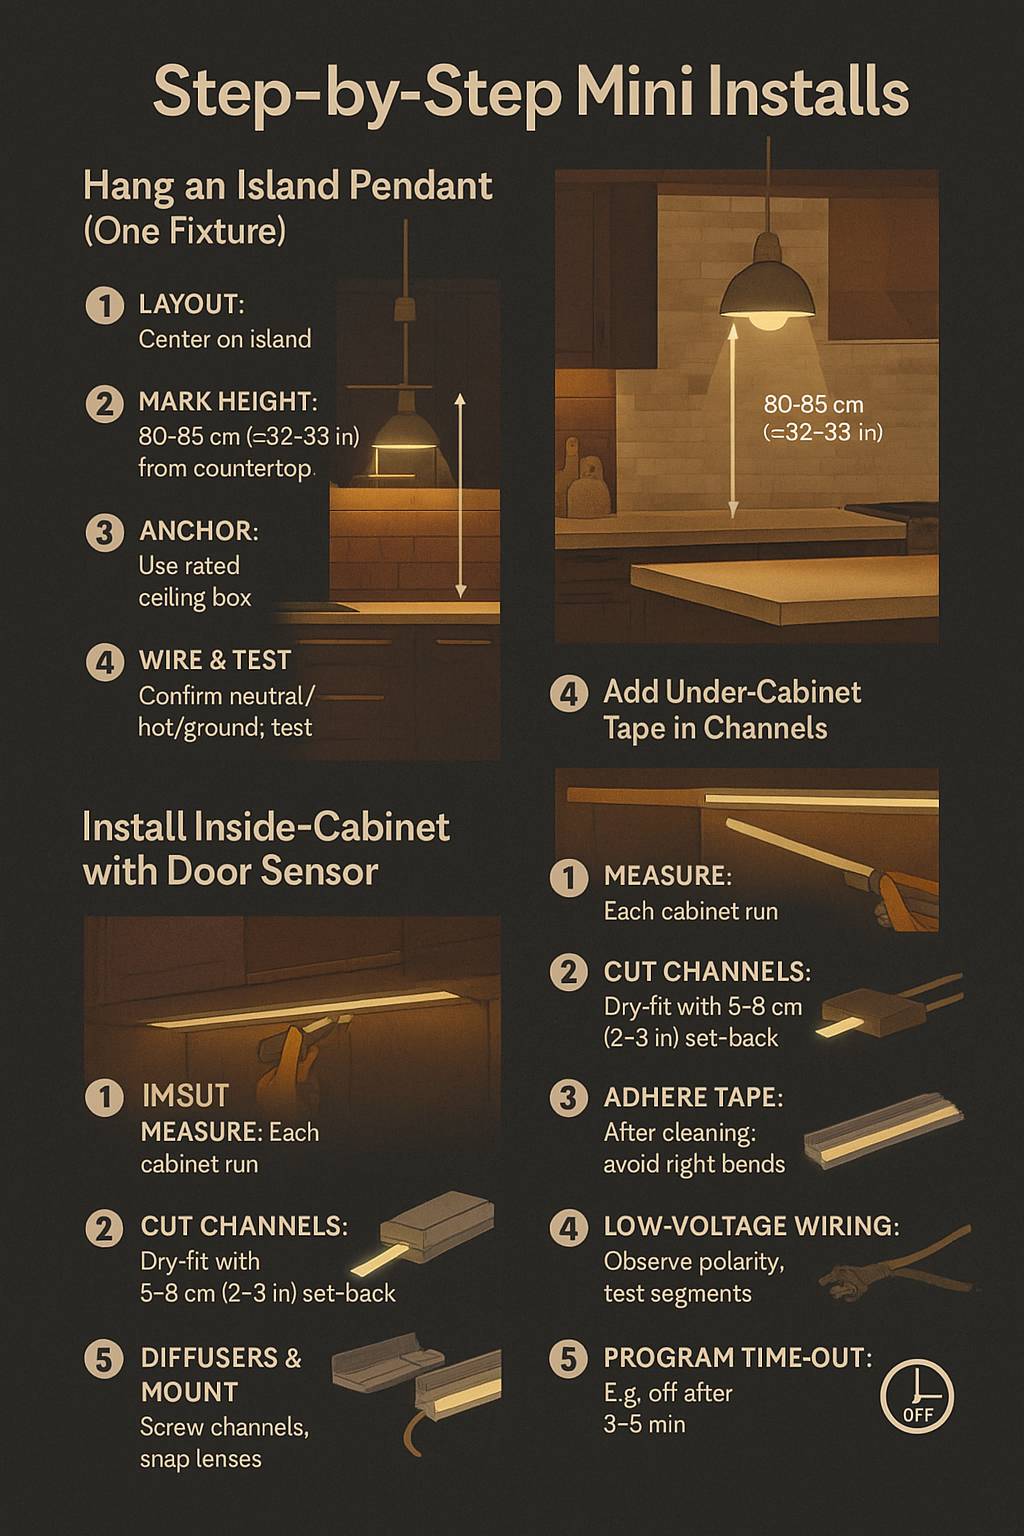
Hang an Island Pendant (One Fixture)
-
Layout: Center on island length; respect hood/sight lines.
-
Mark height: Countertop + 80 cm (≈ 32 in) to fixture bottom is a great start.
-
Anchor: Use rated ceiling box; confirm joist/brace.
-
Wire & test: Confirm neutral/hot/ground, lamp in, test on a compatible dimmer.
-
Aim & finish: Level the canopy, trim cord, final height check.
Add Under-Cabinet Tape in Channels
-
Measure each cabinet run; plan a home run back to the driver or split-feed long spans.
-
Cut channels to length; dry-fit with 5–8 cm (2–3 in) set-back.
-
Adhere tape to channel after cleaning with alcohol; avoid tight bends.
-
Low-voltage wiring: Observe polarity, use solderless connectors sparingly; test each segment.
-
Diffusers & mount: Snap lenses, screw channels, hide wires with raceway.
-
Connect to driver, switch/dimmer, then label circuit.
Inside-Cabinet with Door Sensor
-
Mount sensor on hinge side per instructions.
-
Install vertical strip in slim channel along stile.
-
Route wire through cabinet top to driver location.
-
Program time-out (e.g., off after 3–5 minutes).
Quick Calculators & Spacing Cheats
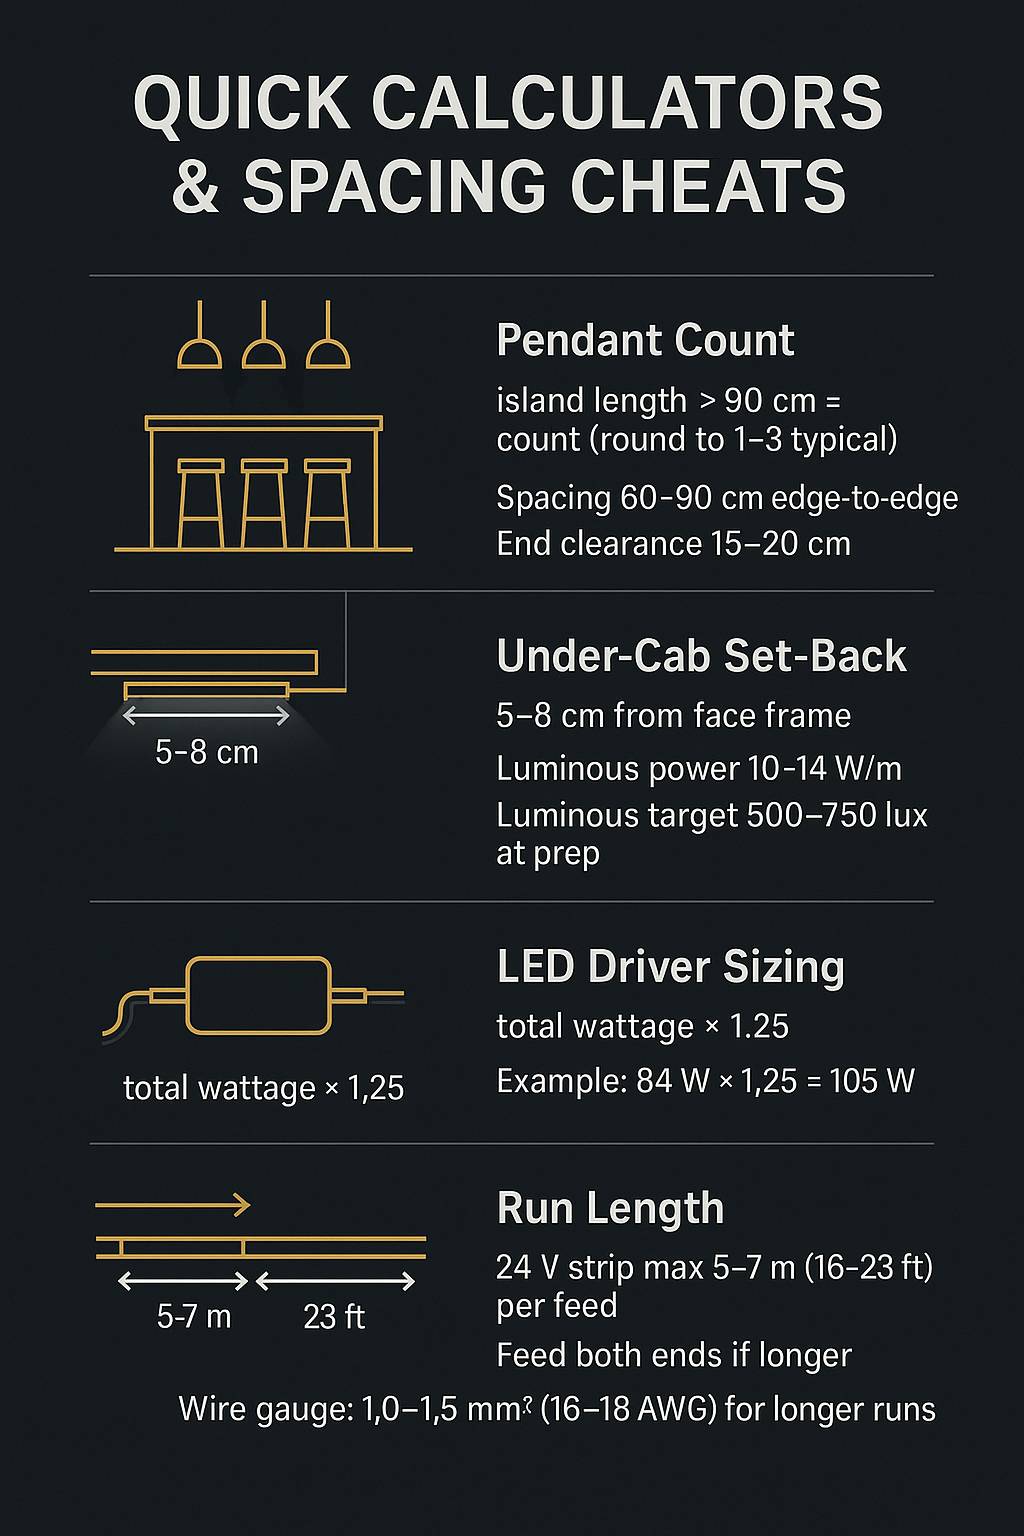
Pendant count (fast rule)
-
Island length in cm ÷ 90 ≈ pendant count (round to 1–3 typical).
-
Example: 240 cm ÷ 90 ≈ 2.7 → 2–3 pendants.
-
Under-cab set-back
-
5–8 cm (2–3 in) from face frame to minimize scallops and put light on the working edge.
LED driver sizing
-
Total wattage × 1.25 (25% headroom).
-
Example: 7 m tape × 12 W/m = 84 W → driver ≥ 105 W at 24 V.
-
Voltage drop sanity
-
Keep individual 24 V tape runs ≤ 5–7 m (16–23 ft) per feed, or feed from both ends. Use 1.0–1.5 mm² (16–18 AWG) for longer low-voltage leads.
Troubleshooting & Common Mistakes
-
Flicker at low dim: Driver/dimmer mismatch. Switch to ELV dimmer or the manufacturer’s recommended model.
-
Harsh “blue” countertops: Your CCT is too high. Swap to 3000–3500 K lamps/tape.
-
Scalloping on backsplash: Fixture too close to wall or too point-source. Move forward and use diffused channels.
-
Dark corners on long runs: Voltage drop. Split the feed or up-size wire gauge.
-
Dotty reflections in glass: Add deeper channels or opal diffusers.
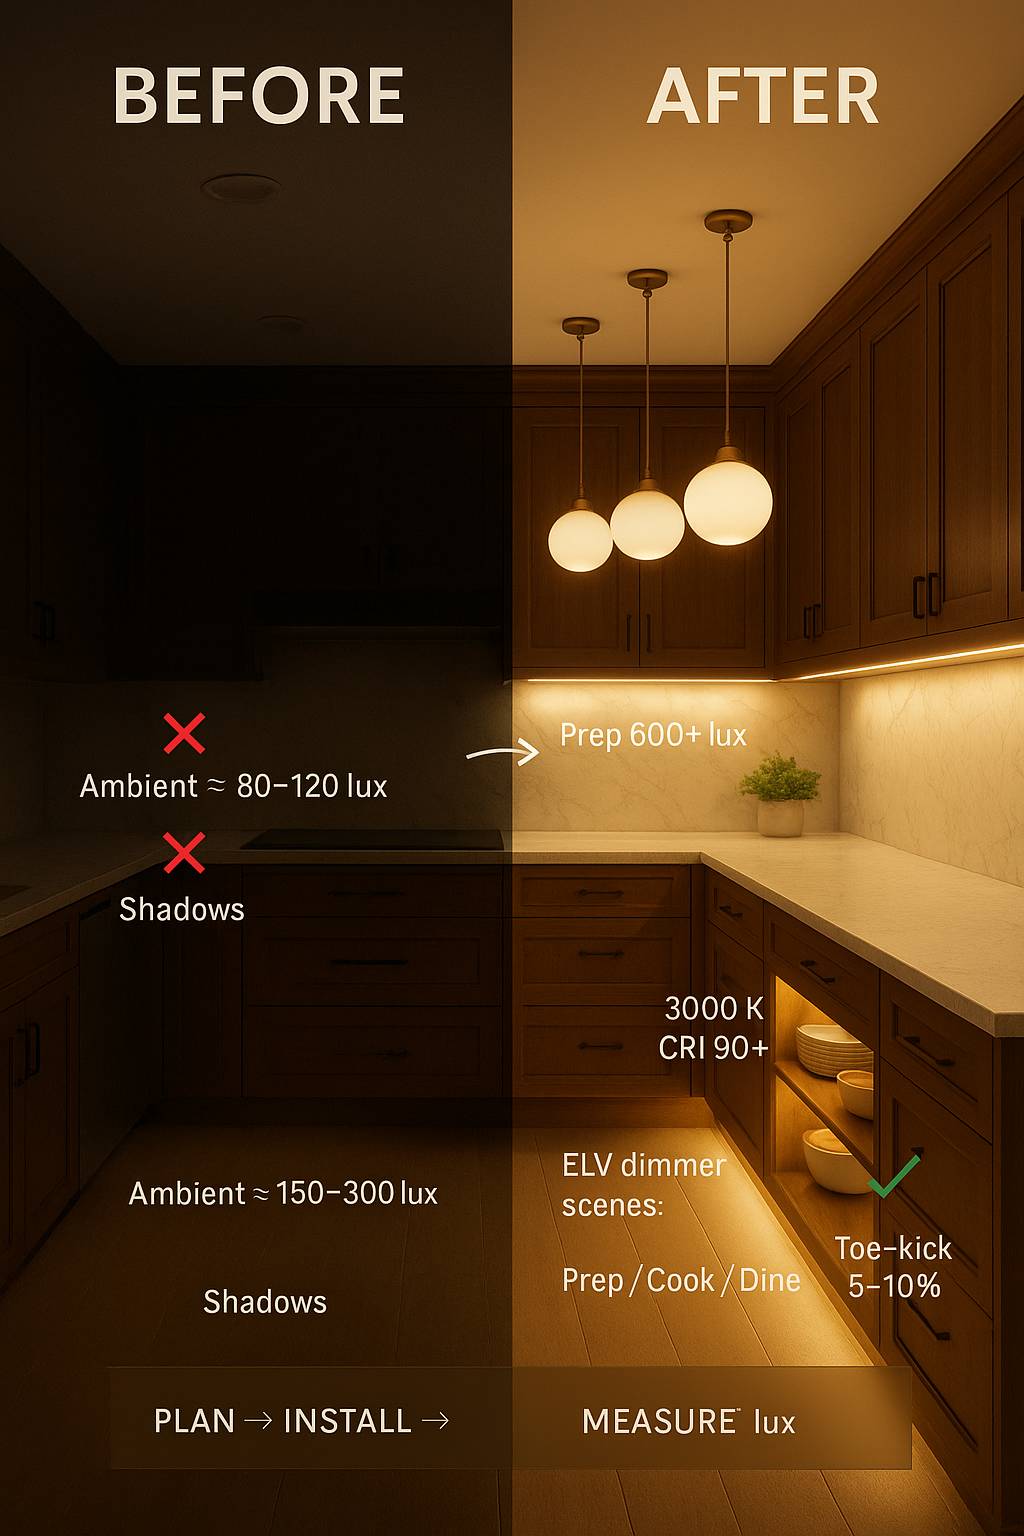
Mini Before/After: A Realistic Upgrade
-
Before: 2 ceiling cans + a decorative island fixture. Prep zones were dim; backsplash looked blotchy; inside cabinets were black holes.
-
Plan: 3 pendants at 85 cm above the island, 24 V under-cab tape in opal channels (7 m total), pantry vertical strip with door sensor, all at 3000 K, CRI 90+, one ELV dimmer for pendants and one for task lights; pantry on sensor only.
-
After: 600+ lux on prep runs, glare-free pendants for dining, even backsplash wash, pantry that lights up on open. Energy use stayed low thanks to LED efficiency and scenes.
FAQs
How many pendants for a 2 m (≈ 6.5 ft) island?
Usually 2 pendants. If shades are small (≤ 25 cm/10 in), 3 smaller can work—keep ~60–75 cm (24–30 in) between edges.
Best Kelvin for white vs. walnut cabinets?
-
White: 3000–3500 K to avoid looking dingy or blue.
-
Walnut/oak: 2700–3000 K to warm the grain.
Can multiple LED runs share one driver?
Yes—if the driver wattage + amperage supports the total load with 25% headroom, and each run is fused or home-run to a terminal block. Keep runs balanced for even brightness.
Do I need CRI 95 for kitchens?
CRI 90+ is the value sweet spot. CRI 95 can look fantastic for food photography or luxury finishes but isn’t mandatory if quality CRI 90+ is used.
Your Action Plan (Copy-Paste)
-
Pick CCT: 3000 K for most homes; 3500 K for a cooler modern look.
-
Choose CRI 90+ across all sources.
-
Finalize pendant count/diameter and set bottom height to ~85 cm (33 in) above countertop.
-
Specify under-cab LED: 24 V, 10–14 W/m, opal channels, 5–8 cm set-back.
-
Add inside-cab strips with door sensors where useful.
-
Select ELV dimmers (or the driver-approved type) and create Prep/Cook/Dine/Night scenes.
-
Size drivers with 25% headroom, plan accessible location, and label circuits.

I’m Mustafa Şen and interior stylist who turns small and awkward spaces into comfortable, character-rich homes. I write about practical layouts, lighting, storage, and materials that age well—always balancing function with a warm, eclectic look.

